
For the past three years Andrew and I have used nothing but the homemade soap that I (and sometimes “we”) make from scratch. It now seems ridiculous to actually purchase soap when I can make it for a fraction of the price and have gorgeous, luxurious soap that I know has no nasty chemicals or synthetic scents (Click here for my basic recipe).
So when it came time to consider what soap I would use with the Bean, I figured of course I would make special baby soap. Except when I googled “DIY Baby Soap” there weren’t a whole lot of recipes. What I did find didn’t really share anything super special about these soaps.
Things to consider when making soap for babies:
- Babies have delicate, sensitive skin
- Soap should be superfatted (LOTS of extra oil) with gentle oils such as olive oil
- Superfatted soaps need double to triple curing time
- Keep essential oils out or to an extreme minimum
- Coconut oil should be diminished as it’s relatively “harsh” as a cleansing oil
- Milks (such as buttermilk) could be added for extra softness
- When modifying oil amounts in the recipe, you also should modify lye amounts to assure ph- using a Lye Calculator is essential.
I made a batch of superfatted olive oilsoap and promptly gave half of it away. (recipe for basic olive oil soap: 25oz olive oil, 3oz coconut oil, 3.5oz apricot oil, 2tbsp castor oil, 12oz water and 4.15oz lye).
So- another batch was needed and I figured this time I’d try something different and extra special: Buttermilk Soap.
Buttermilk (or milk) soaps are when you replace most or all of the water with a milk. Unfortunately, the added sugars in milk react differently when added to the lye: increasing the heat output in the chemical reaction. As a result you’ll likely scorch your milk. Scorching the milk results in a bad smell and discoloured soap.
A way around this is to freeze the milk, keep the lye-milk mixing container ensconced in a bowl filled with ice and SLOWLY add the lye to the iced milk. Keeping track of temperature with a thermometer is also recommended, but we don’t have one…. so I figured I’d just be extra careful and leave the lye-buttermilk mixture in the ice bath to cool while I got everything else ready.
Another aspect of milk soap making: instead of placing it into the oven to warm for 1.5hrs, immediately after pouring put the soap in the fridge for 24hrs followed by another 24-48hrs in the mould at room temperature prior to cutting for curing.
For more info on milk soap making- read Soap Queen’s article.
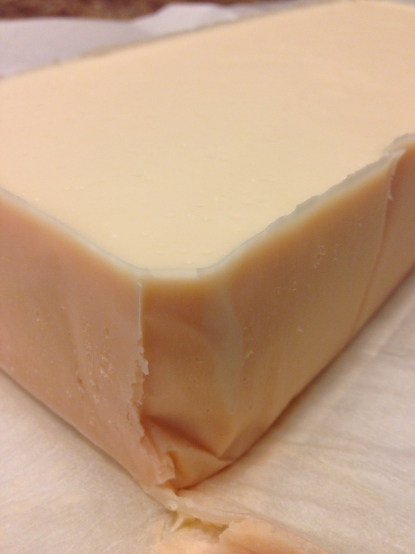
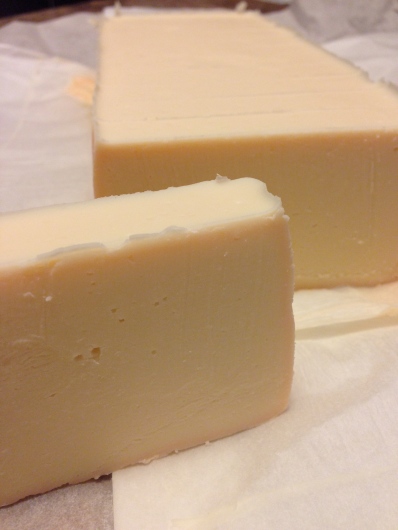
Overall I’d say my first foray into milk soap making was a success. However, despite my efforts, it would appear that I, very very mildly, scorched the buttermilk- as you can see by the very light pinkish/peach tinge on the outside of the soap. There was no scorched smell and the discolouration really was limited to a very thin layer on the outside of the soap. It shouldn’t impact the quality of the soap at all, so I’m happy with it.
The soap itself was EXTREMELY soft when we cut it after sitting at room temperature for 30hrs. I’ll likely leave it to cure for at least 4-6 weeks, if not longer. You can see that these superfatted soaps really need to be planned in advance if you want them when the baby arrives.
Testing the soap first on yourself and then on a TINY section of baby is very important to make sure that it’s safe. These soaps are not tear-free, so avoid eyes, nose and mouth!
Here’s the recipe and process I used:
ECOYOGINI’S BUTTERMILK BABY SOAP
(Check out my initial soap making post for other tips)
- 25 oz olive oil
- 3 oz coconut oil (unrefined)
- 3.5 oz avocado oil
- 2 tbsp castor oil
- 8 oz buttermilk (frozen)+4 oz water
- 4.16 oz Lye (HRM- Home Hardware)
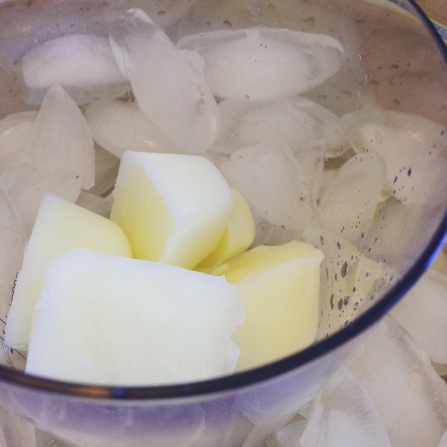
FIRST: Freeze buttermilk in ice cube tray. Once frozen, fill large bowl with ice, place plastic lye-buttermilk mixing container in the centre of the ice bath, add buttermilk cubes and water.
LYE: Using gloves, glasses and face mask (SAFETY!), measure the lye and SLOWLY add, bit by bit, to the buttermilk, slowly stirring each addition and gradually melting the buttermilk. If you can, do this in an aerated area or outside (as the chemical reaction will create steam). When the lye is completely added, continue stirring for several minutes to assure that all the lye has dissolved. Leave buttermilk-lye mixture in ice bath while prepping other ingredients.
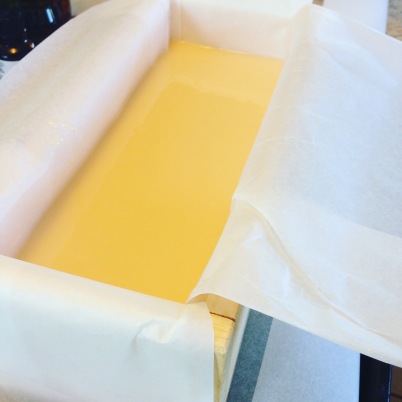
OILS/MOULD: Using parchment paper, cut in two large pieces and line your mould (wooden moulds work well, but I know people who’ve used milk cartons) width and then length (folding the parchment paper to fit works well).
Using a double boiler (pot with inch water and metal bowl placed on top), melt the coconut oil. In a ceramic bowl, add avocado, olive and castor oils. Add melted coconut oil and stir.
Donning gloves, face mask and glasses again, grab your immersion blender (or hand mixer) and SLOWLY add the lye-buttermilk mixture to the oils while blending. Blend mixture until it comes to trace (when you lift the blender and it leaves a circle mark in the pudding thickness mixture). After a few minutes of blending you could add one teaspoon of a gentle essential oil (avoid stronger scents such as peppermint, which is drying, or cinnamon etc).
Pour soap mixture into the mould and immediately refrigerate for 24 hours (I placed parchment paper on an old cookie sheet and placed the wooden mould on top in case some of the soap leaked out). After 24 hrs, remove the mould, cover the top with parchment paper to protect against dust (or cat interference) and leave for 24-48hrs at room temperature.
CUTTING: Remove the soap and unwrap. Hopefully no discolouration will have occurred! Using a large knife, gently mark where you will slice across the top (about an inch, should make about 12-13 bars of soap). Slowly cut the soap.
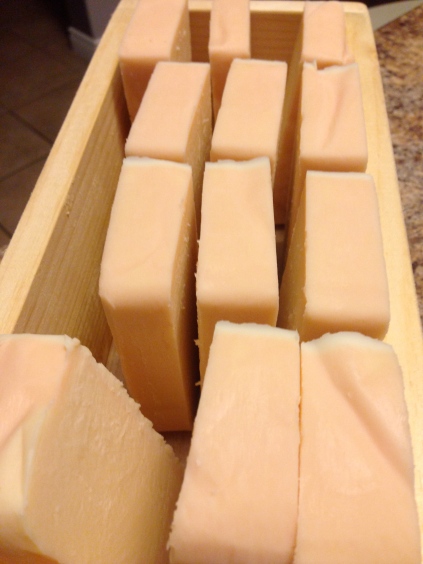
CURING: Place the bars of soap standing up (long edge) about an inch apart somewhere (cat) safe (we store ours in the basement) and allow to cure for at least 4 weeks-6 weeks. The soap shouldn’t dent (hardly) at all if it’s ready. If there’s a strange smell initially, it’s just the smell of lye without any essential oils to cover it up. This scent will fade and disappear over the curing time.
There you have it! This soap would also make a lovely, super gentle, grown up soap (we’ll definitely be using it!). Happy Soap Making!

I don’t know why the idea of using bar soap with baby hadn’t occurred to me, even though I use it on myself. My baby HATES the bath (screams like we are murdering her), though, so I’m not sure we could since we need to be as quick as possible with bathing her. It seems like bar soap would take longer to lather than the soap we use that comes in a foaming hand pump (earth mama baby angel).
LikeLiked by 1 person
oh no! poor you guys- bath time does not sound like fun- hopefully that changes as she grows! And yes, definitely in-out as fast as possible, and foamy pump would be much much quicker!
LikeLike